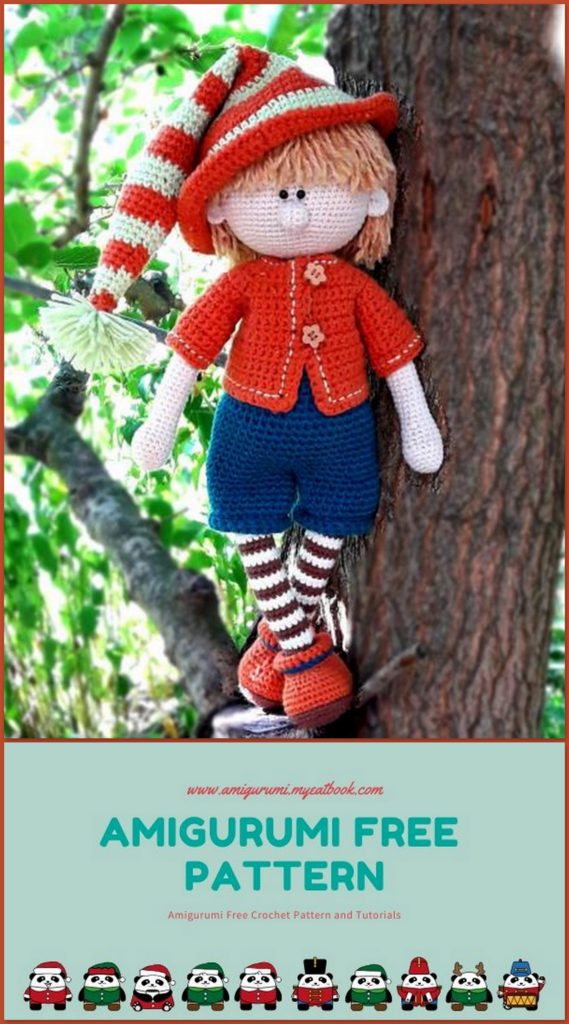
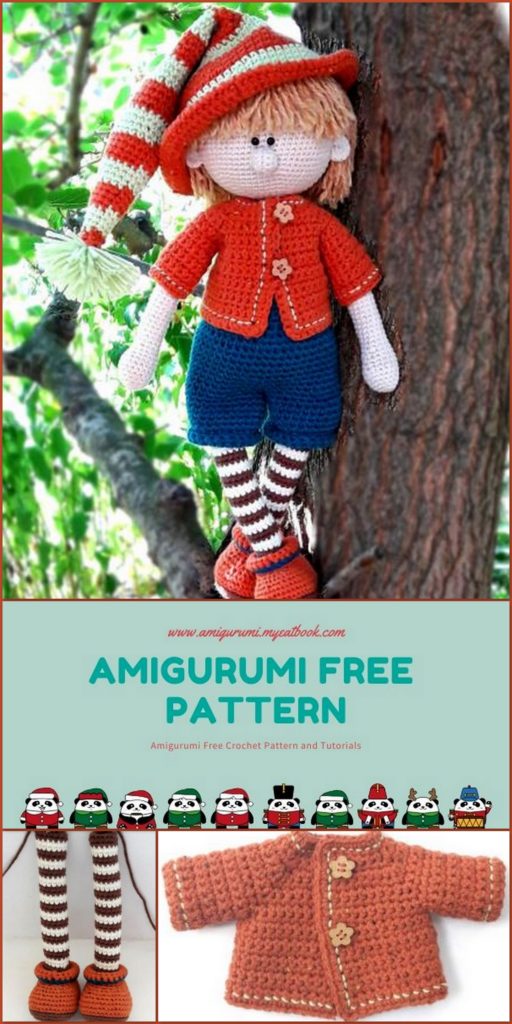
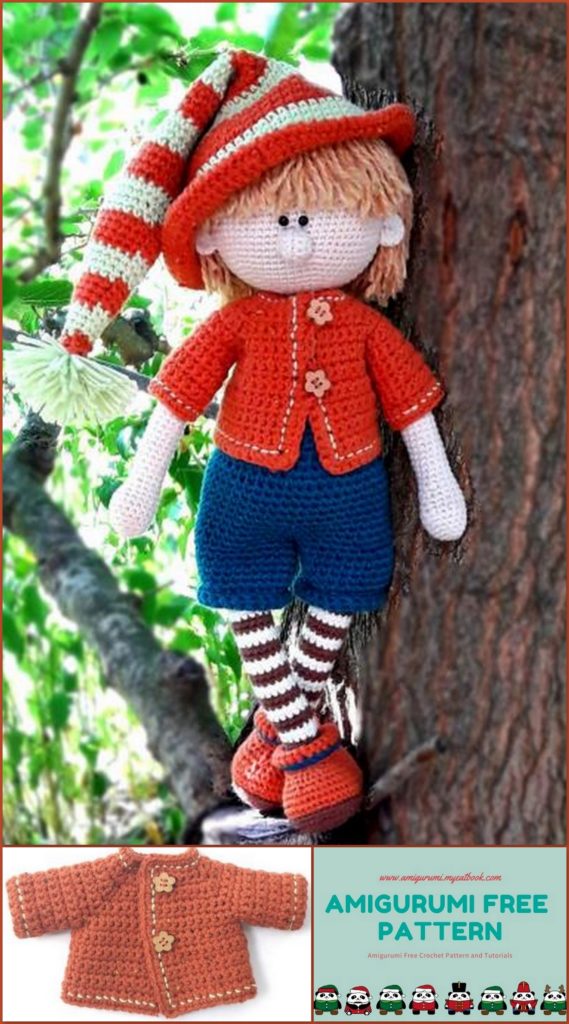
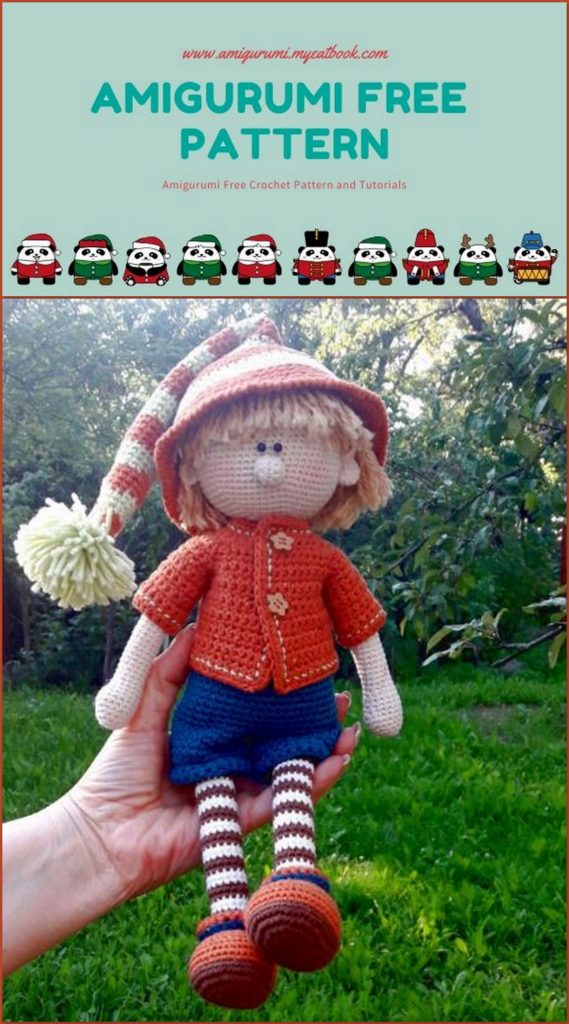
Yarn and Equipment
1. Alize Cotton Gold, cotton (55%), acrylic (45%), color light-beige (67), 330 m – 100 g. Weight: Sport (12 wpi) (Used for the head, body and arms of the doll). You will need approximately 30-40 g of the yarn.
2. Alize Cotton Gold color brown (493) and color cream (01) (Used for the sole of the boots and stripes on the socks (legs)). Approximately 10 g of the yarn.
3. Alize Cotton Gold Tweed color terracotta (89) (Used for the jacket, boots and the stripes on the hat). Approximately 30 g of the yarn.
4. Alize Cotton Gold color dark aqua (17) (Used for the breeches). Approximately 10 g of the yarn.
5. Alize Cotton Gold color Acid Green (612) (Used for the stripes on the hat). Approximately 10 g of the yarn.
6. Crochet hook: 2 mm, 2,5 mm and 2,75 mm.
7. Chopstick (or any other wooden stick with a blunt end) – for the stuffing of the toy.
8. Washable polyester filling for the stuffing of the toy.
9. Yarn needle – a long needle for assembling of the toy.
10. 2 beads – for the eyes
11. 2 small buttons for the jacket.
12. A piece of thick carton in size 36 сm by 9 сm (14,5″ x 3,5″). If you use the materials as advised above the final size of the toy is going to be 30 cm (12″) from top of the head to toes or 18 cm (7″) when seated. Pattern written using USA terminology

Abbreviations
R- row
ch – chain stitch;
ch-sp – chain space
sc – single crochet;
ss – slip stitch;
dec- decreasing;
inc – increasing (2 sc in 1 st);
MR – Magic ring
St/Sts – stitch/stitches

Head (1 piece)
Use a 2mm crochet hook. The piece should be stuffed in the process of crocheting.
R 1: 6 sc in MR (6)
R 2: 6 inc (12)
R 3: (1 sc, 1 inc) 6 times (18)
R 4: (2 sc, 1 inc) 6 times (24)
R 5: (3 sc, 1 inc) 6 times (30)
R 6: (4 sc, 1 inc) 6 times (36)
R 7: (5 sc, 1 inc) 6 times (42)
R 8: (6 sc, 1 inc) 6 times (48)
R 9: (7 sc, 1 inc) 6 times (54)
R 10: (8 sc, 1 inc) 6 times (60)
R 11: (9 sc, 1 inc) 6 times (66)
R 12-25: 1 sc in each stitch around (66)
R 26: (9 sc, 1 dec) 6 times (60)
R 27: (8 sc, 1 dec) 6 times (54)
R 28: (7 sc, 1 dec) 6 times (48)
R 29: (6 sc, 1 dec) 6 times (42)
R 30: (5 sc, 1 dec) 6 times (36)
R 31: (4 sc, 1 dec) 6 times (30)
R 32: (3 sc, 1 dec) 6 times (24)
R 33: (2 sc, 1 dec) 6 times (18)
R 34: (1 sc, 1 dec) 6 times (12)
Stuff the head tightly and shape it into a ball.
R 35: 6 dec (6)
Cut the thread leaving a long tail for sewing.
Nose (1 piece)
Use a 2mm crochet hook.
R 1: 3 sc in MR, chain1, turn your work (3)
R 2: 3 inc, chain1, turn your work (6)
R 3-5: 1 sc in each stitch, chain1, turn your work (6)
R 6: 3 dec, chain1, turn your work (3)
R 7: 1 sc in each stitch (3)
Cut off the thread. Using the same thread close the opening a bit, add some more stuffing to it
and then sew the opening together. The piece should look like a small ball.
Ears (2 pieces)
Use a 2mm crochet hook.
R 1: 6 sc in MR, 1 ch, turn your work (6)
R 2: (1 sc, 1 inc) 3 times (9)
Cut off the thread, pull the ring and fix the thread.
Assembling of the head
Pin the nose just above the middle of the head.
Fix the ears with the help of sewing pins on the same
level as the nose. Sew the nose on around the pin in
turn taking the stitches of the head and nose. Try to
get the stitches of the head as close to the base of the
nose as possible. Fix the thread well and hide its tail
inside the head. Then sew the ears on in turn taking
the stitches of the head and ear. Fix the thread well
and hide its tail also inside the head. Mark the place
for the eyes. Attach the beads that you planned to use
for the eyes.
Body
Work the body in spiral rounds. 2mm crochet hook.
R 1: 18 ch, insert the crochet hook into the first loop of the chain and start crocheting spiral
wise 18 sc.
R 2-3: 1 sc in each stitch around (18)
R 4: (2 sc, 1 inc) 6 times (24)
R 5: 1 sc in each stitch around (24)
R 6: (3 sc, 1 inc) 6 times (30)
R 7: (4 sc, 1 inc) 6 times (36)
R 8-9: 1 sc in each stitch around (36)
R 10: (8 sc, 1 inc) 4 times (40)
R 11-14: 1 sc in each stitch around (40)
R 15: 8 sc, 1 inc, 18sc, 1 inc, 10sc (42)
R 16-17: 1 sc in each stitch around (42)
R 18: 10 sc, 1 inc, 20sc, 1 inc, 10sc (44)
R 19: 1 sc in each stitch around (44)
R 20: 11 sc, 1 inc, 20sc, 1 inc, 11sc (46)
R 21-22: 1 sc in each stitch around (46)
R 23: 11 sc, 1 inc, 22sc, 1 inc, 11sc (48)
R 24-25: 1 sc in each stitch around (48)
R 26: 12 sc, 1 inc, 22sc, 1 inc, 12sc (50)
Cut off the light-beige yarn. Switch to the
brown colored yarn.
R 27-29: 1 sc in each stitch around (50)
R 30: 12 sc, 1 inc, 24sc, 1 inc, 12sc (52)
R 31-32: 1 sc in each stitch around (52)
R 33: 13 sc, 1 inc, 24sc, 1 inc, 13sc (54)
R 34-35: 1 sc in each stitch around (54)
R 36: (7 sc, 1 dec) 6 times (48)
R 37: 1 sc in each stitch around (48)
R 38: (6 sc, 1dec) 6 times, ss (42)
Cut off the yarn leaving a long tail for sewing.
Arms (2 piece)
2mm crochet hook.
Start at the underside of the arm.
R 1: 6 sc in MR (6)
R 2: 6 inc (12)
R 3: (5 sc, 1 inc) 2 times (14)
R 4: (6 sc, 1 inc) 2 times (16)
R 5: (7 sc, 1 inc) 2 times (18)
R 6: 1 sc in each stitch around (18)
R 7: 7sc, 2 dec, 7sc (16)
R 8: 7sc, 1 dec, 7sc (15)
R 9: 1 sc in each stitch around (15)
R 10: 7sc, 1 dec, 6sc (14)
R 11: 6sc, 1 dec, 6sc (13)
R 12: 1 sc in each stitch around (13)
Stuff the ready part of the arm tightly. Then gradually
stuff the arm as you crochet, higher you go less stuffing
should be added.
R 13-42: 1 sc in each stitch around (13)
R 43: (2sc, 1 dec) 3 times, 1sc (10)
Cut off the yarn leaving a long tail for sewing.
The last 4-5 rows to not add the stuffing at all or stuff
very loosely so that the arms do not stick out too much.
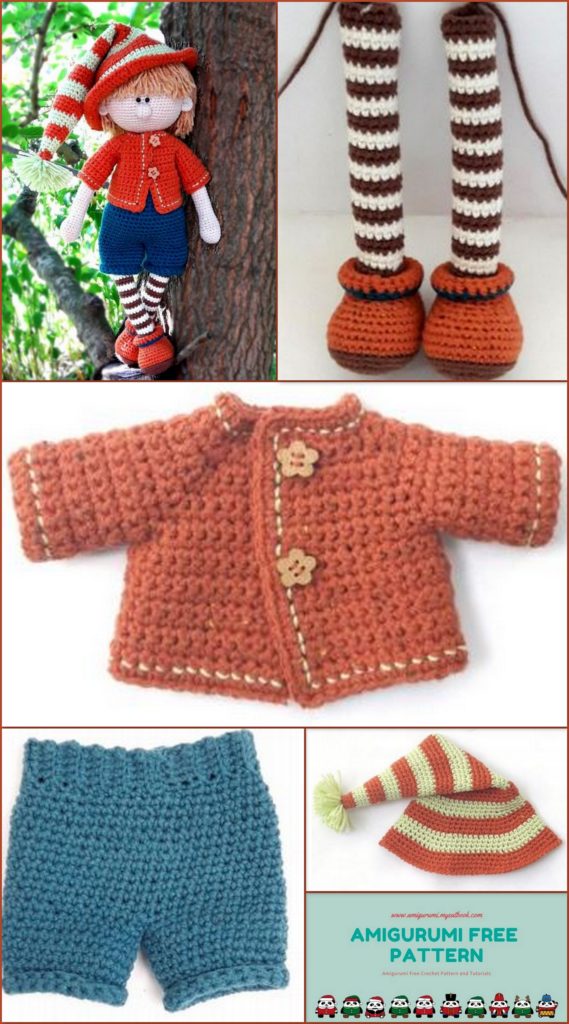
Legs (2 pieces)
Use a 2mm crochet hook and brown colored yarn.
Ch 8 and work starting from the 2 nd st from the hook
around the foundation chain:
R 1: 1 inc, 5sc, 4sc in one st, 5sc, 1 inc (18)
R 2: 1sc, 1 inc, 4 sc, 6 inc, 4 sc, 1 inc, 1sc (26)
R 3: 2sc, 1 inc, 4 sc, (1sc, 1 inc) 6 times, 4 sc, 1 inc, 2sc (34)
R 4: 1 inc, 9sc, 1 inc, (2sc, 1 inc) 5 times, 8 sc (41)
R 5: 1 sc, 1 inc, 39 sc (42)
Cut off the brown thread and attach the terracotta yarn.
R 6: 42sc into the back loop of the stitch (42)
R 7-8: 1 sc in each stitch around (42)
R 9: 12sc, 1 dec, (2sc, 1 dec) 5 times, 8sc (36)
R 10: 1 sc in each stitch around (36)
R 11: 11sc, 1 dec, (1sc, 1 dec) 5 times, 8sc (30)
R 12: 10 sc, 6 dec, 8sc (24)
R 13: 1 sc in each stitch around (24)
R 14: (2sc, 1 dec) 6 times (18)
Go on crocheting the lapel of the shoe.
R 1 lapel of the shoe: 18sc into the front loop the stitch (18)
R 2 lapel of the shoe: (2sc, 1 inc) 6 times (24)
R 3-4 lapel of the shoe: 1 sc in each stitch around (in the 4th row add an extra 2-3 sc so that the
marker is in the centre of the back).
Cut off the terracotta colored thread. Attach the dark aqua colored yarn.
R 5 lapel of the shoe: 1 sc in each stitch around, ss (24)
Cut off the thread of the dark aqua color, fix it and hide between the stitches.
Continue crocheting the legs.
Fold out the lapel of the shoe. Add the brown yarn to the remaining half stitches in the 14th row
in the center of the back; place a new marker.
R 15: 18sc into the back loop of the stitch in the 14th row.
R 16: (4sc, 1 dec) 3 times (15)
Later on while crocheting you should make sure that the marker stays in the center of the back
of the leg so that the line of where you change yarn color does not move towards the front. For
that you can crochet an extra sc if needed and move the marker.
R 17: 1 sc in each stitch around (15)
Do not cut off the brown thread. Add the cream thread and continue crocheting.
R 18-19: 1 sc in each stitch around (15)
Switch to the cream colored yarn
R 20-21: 1 sc in each stitch around (15)
Stuff the shoe tightly. Then stuff the leg loosely while working on it especially last 2,5 cm,
making sure that the leg is not flat.
R 22-45: repeat 18-21 rows (change color from brown to cream and vice versa every two
rows).
Cut off the brown colored thread leaving a long tail for sewing. Cut off the cream colored
thread altogether and fix the end, then hide it between the rows.
Assembling of the toy
Fold the body of the toy so that the marker is in the center of the back side. Fold the upper
parts of the legs in half so that the front of the shoes face you. Attach the external stitches on
the sides of the body with the external stitches on the sides of the legs (see photo). Attach the
legs to the body by sewing around the legs using the connecting stitches grabbing both the
stitches of the legs and the stitches of the body in turns. You could also sew the legs on to the
body with the help of the needle if it is more comfortable for you. Once the legs are sewn to the
body, stuff loosely the body so it takes shape of the body and keeps it without being too firm. If
you want the doll to be seated easily and move his legs, do not stuff the body tightly in its lower
part. Then sew together the opening of the body using the connecting stitches.
the neck tightly through the opening in the
upper part of the body.
Fix the head onto the body with the help of yarn
needles and attach it sewing in the round. The
head should be sturdy without leaning.
Stuff the arms not too tightly up to a bit
above the middle. Fix them with sewing
pins to the body and attach them sewing in
the round. If you want the shoulders to look
more natural press them with an iron
through a wet cloth.
The Hair
Crochet Hook 3 mm. Yarn in light-yellow color.
Try the «hat» on – it should fit very tightly on the head of your doll and not come down the
head too much. I had to crochet 13 rows for the «hat» of my doll. The «hat» for your doll could
take more rows or less taking into consideration the yarn you are using and the thickness of
your crocheting. If when crocheting approximately the 7 th row you see that you don’t need to
add any more rows, then do not add any. If see that you need more increases, do one more row
of them ((7 sc, 1 ins) 6 times), and then crochet the rows of 52 stitches.
R 1: 6 sc in MR (6)
R 2: 6 inc (12)
R 3: (1 sc, 1 inc) 6 times (18)
R 4: (2 sc, 1 inc) 6 times (24)
R 5: (3 sc, 1 inc) 6 times (30)
R 6: (4 sc, 1 inc) 6 times (36)
R 7: (5 sc, 1 inc) 6 times (42)
R 8: (6 sc, 1 inc) 6 times (48)
R 9-13: 1sc in each st around (48)
Cut off the thread leaving a long tail for sewing.
Wind the yarn around the piece of carton in size (14,5″ x 3,5″) and cut the yarn along one of the
sides.
For the hat not to move fix it onto the head of the toy with the help of the pins. Do not put it too
far on the forehead otherwise the hair will cover all the face. Sew on the hat to the head
following the last row of the crochet.
Now we are going to attach the hair. Take the prepared cut hairs and, following the first
row of the hat, start attaching the hairs as in the photos.
Do not attach the hairs too close to each other – leave the distance between the hairs about 0.8
cm or (0,3inch), then you will see where to add the hairs when needed.
Go up 0,5 cm (0,2 inch) from the first row of the hairs and start to insert the hairs in a
checkerboard pattern. Continue until you fill all “hat” with hairs.
Cut the hair of the doll in the way that you like. Do not cut it a lot at once, try to cut gradually
forming the desired haircut. With the help of a blusher add some color to the cheeks.
That is all! Now you can dress up the Doll!
Jacket
The jacket is crocheted by turning the rows starting from the neck. Use the 2,5 mm crochet
hook and terracotta colored yarn.
Ch 33 and work starting from 2 nd st from the hook.R 1-2: 32 sc, 1 ch, turn the work
R 3: 1 sc, 2 ch, skip 2, 3 sc, 3 sc in one st, 4 sc, 3 sc in one st, 8 sc, 3 sc in one st, 4 sc, 3 sc in
one st, 6 sc, 1 ch, turn the work (40)
R 4: 7 sc, 3 sc in one st, 6 sc, 3 sc in one st, 10 sc, 3 sc in one st, 6 sc, 3 sc in one st, 7 sc (4sc,
2sc in ch2- sp, 1 sc), 1 ch, turn the work (48)
R 5: 1 sc in each st (48)
R 6: 8 sc, 3 sc in one st, 8 sc, 3 sc in one st, 12 sc, 3 sc in one st, 8 sc, 3 sc in one st, 8 sc, 1 ch,
turn the work (56)
R 7: 9 sc, 3 sc in one st, 10 sc, 3 sc in one st, 14 sc, 3 sc in one st, 10 sc, 3 sc in one st, 9 sc,
1ch, turn the work (64)
R 8: 11 sc, 4 ch, skip 12 sc, 18 sc, 4 ch, skip 12 sc, 11 sc, 1ch, turn the work (48)
R 9: 48 sc (11 sc, 4 sc on chains, 18 sc, 4 sc on chains, 11 sc) (48)
R 10: 45 sc, 2 ch, skip 2, 1 sc, 1 ch, turn the work (48)
R 11: 48 sc (1 sc, 2 sc in ch2-sp, 45 sc), 1 ch, turn the work (48)
R 12-18: 1 sc in each st, 1 ch, turn the work (48)
К 19: 47 sc, 3 sc in one st, turn the work clockwise and crochet sc all along around the work in
the direction shown by the arrows in the photo (side- collar-side). Do not crochet the sc on the
bottom of the jacket should not be crocheted around. Crochet 3 sc in one st at corner points so
that the work could be unfolded without the corners curling.
Sleeves
Attach the thread in the center of the armhole under the arm.
R 1: 1 ch, 16 sc, 1 ss in ch, 1 ch, turn the work
R 2-9: 16 sc (1 sc in each st), ss in ch, 1 ch, turn the work
R 10: 16 sc (1 sc in each st), ss in ch.
Cut and fasten off.
Repeat for the other sleeve.
Decorate the hem of the sweater, sleeves and collar in backstitch with the help of the Acid
Green yarn (I have split the yarn in half for decoration so the stitch is not too thick) – when
doing that take a stitch at a time. Sew on 2 small buttons matching button holes.
Breeches
Use hook 2,5 mm.
The Belt of the Breeches
Ch 6 and work starting from 2nd st counting from the hook.
The top of the breeches.
R 1-39: 5 sc into the back loop of the stitch, 1 ch, turn the work
Attach the piece together with the help of the connecting stitches.
Switch to the 2.75 cm crochet hook. Keep crocheting the breeches.
R 1: Crochet around the band 40 sc
R 2: (4 sc, inc) 8 time (48)
R 3-13: 48 sc (1 sc in each st)
Left Leg of the Breeches
R 14: 3 ch, skip 23 sc, 24 sc and insert the crochet hook into the 24th sc counting from the
marker (27)
Continue crocheting on this side of the stitches.
R 15: 27 sc (3 sc on chains, 24 sc)
R 16-19: 27 sc (1 sc in each st)
R 20: (7 sc, 1 dec) 3 times (24)
R 21: (6 sc, 1 dec) 3 times (21)
R 22-23: 21 sc (1 sc in each st), ss (21)
Cut and fasten off.
Right Leg of the Breeches
Attach the yarn to the 1th stitch of the 13th row of the breeches.
R 14: 27 sc (24 sc, 3 sc on the other side of the on chain)
R 15-19: 27 sc (1 sc in each st)
R 20: (7 sc, 1 dec) 3 times (24)
R 21: (6 sc, 1 dec) 3 times (21)
R 22-23: 21 sc (1 sc in each st), ss (21)
Cut and fasten off.
Fold outside the last 2 rows of the breeches.
Hat
Begin with the terracotta colored yarn. Use 2,5 mm hook.
R 1: 6 sc in MR (6)
R 2: 1 sc in each stitch around (6)
R 3: (1 sc, 1 inc) 3 times (9)
R 4: 1 sc in each stitch around (9)
Change to Acid Green colored yarn
R 5: 1 sc in each stitch around (9)
R 6: (2 sc, 1 inc) 3 times (12)
R 7-8: 1 sc in each stitch around (12)
Change to terracotta colored yarn
R 9: (3 sc, 1 inc) 3 times (15)
R 10-12: 1 sc in each stitch around (15)
Change to Acid Green colored yarn
R 13: 1 sc in each stitch around (15)
R 14: (4 sc, 1 inc) 3 times (18)
R 15-16: 1 sc in each stitch around (18)
Change to terracotta colored yarn
R 17: (8 sc, 1 inc) 2 times (20)
R 18-19: 1 sc in each stitch around (20)
R 20: (9 sc, 1 inc) 2 times (22)
Change to Acid Green colored yarn
R 21-22: 1 sc in each stitch around (22)
R 23: 2 sc, 1 inc, 10 sc, inc, 8 sc (24)
R 24: 1 sc in each stitch around (24)
Change to terracotta colored yarn
R 25: 1 sc in each stitch around (24)
R 26: (1 inc, 11 sc) 2 times (26)
R 27-28: 1 sc in each stitch around (26)
Change to yarn color Acid Green
R 29: 1 sc, 1 inc, 12 sc, inc, 11 sc (28)
R 30: 1 sc in each stitch around (28)
R 31: 3 sc, 1 inc, 13 sc, inc, 10 sc (30)
R 32: 1 sc in each stitch around (30)
Change to terracotta colored yarn
R 33: (1 inc, 14 sc) 2 times (32)
R 34: 1 sc in each stitch around (32)
R 35: 4 sc, 1 inc, 15 sc, inc, 11 sc (34)
R 36: 1 sc in each stitch around (34)
Change to Acid Green colored yarn
R 37: (16 sc, 1 inc) 2 times (36)
R 38: 2 sc, 1 inc, 17 sc, inc, 15 sc (38)
R 39: 1 sc in each stitch around (38)
R 40: (1 inc, 18 sc) 2 times (40)
Change to terracotta colored yarn
R 41: 1 sc in each stitch around (40)
R 42: 3 sc, 1 inc, 19 sc, inc, 16 sc (42)
R 43: 1 sc in each stitch around (42)
R 44: (1 inc, 20 sc) 2 times (44)
Change to Acid Green colored yarn
R 45: 1 sc in each stitch around (44)
R 46: 2 sc, 1 inc, 21 sc, inc, 19 sc (46)
R 47: 1 sc in each stitch around (46)
R 48: (22 sc, 1 inc) 2 times (48)
Change to terracotta colored yarn
R 49: (11 sc, 1 inc) 4 times (52)
R 50: 1 sc in each stitch around (52)
R 51: 1 sc, 1 inc, (12 sc, 1 inc) 3 times, 11 sc (56)
R 52: 1 sc in each stitch around (56)
Change to Acid Green colored yarn
R 53: 3 sc, 1 inc, (13 sc, 1 inc) 3 times, 10 sc (60)
R 54: 1 sc in each stitch around (60)
R 55: 1 sc, 1 inc, (14 sc, 1 inc) 3 times, 13 sc (64)
R 56: 2 sc, 1 inc, (15 sc, 1 inc) 3 times, 13 sc (68)
Change to terracotta colored yarn
R 57: (16 sc, 1 inc) 4 times (72)
R 58: (1 inc, 11 sc) 6 times (78)
R 59: 3 sc, 1 inc, (12 sc, 1 inc) 5 times, 9 sc (84)
R 60: (13 sc, 1 inc) 6 times, ss (90)
R 61: 1 ch, 90 reverse sc or Crab Stitch, ss in ch
Cut and fasten off.
Make a pompom from the Acid Green yarn and
fix it to the end of the hat.
*******************************************************************
And that’s it!
Now you can praise yourself and give yourself a little pat on the back for a job


well done)))