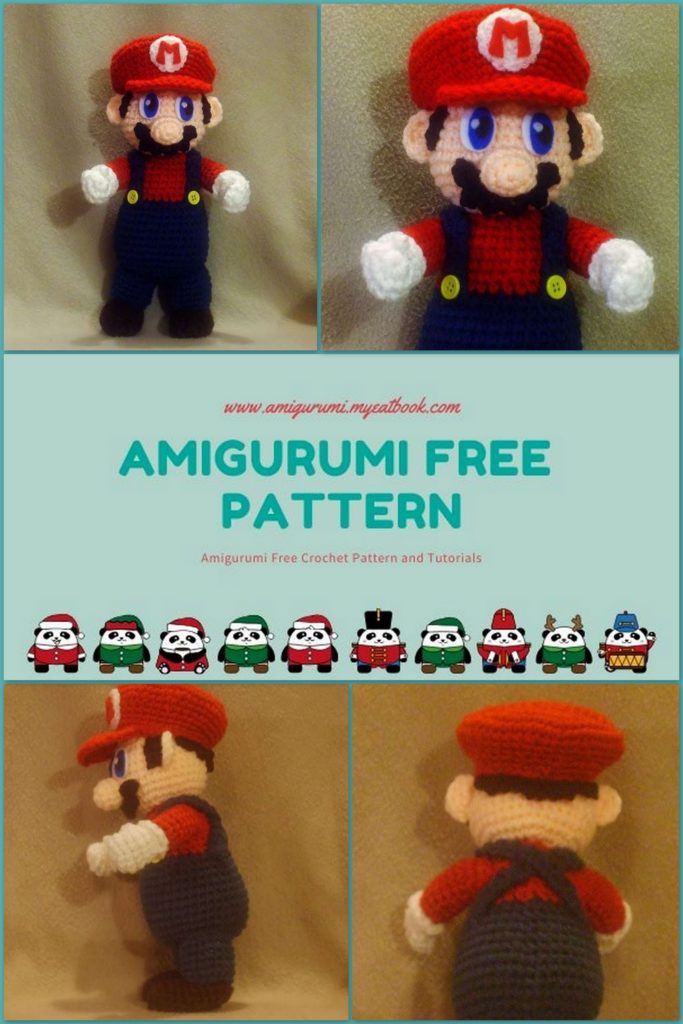
Amigurumi Mario Free Crochet Pattern
Mario amigurumi

Have a nice knitting!
We will need:
– yarn of flesh, blue, red, white, and quite a bit black and brown;
– hook;
– filler;
– a little red, white, blue and black felt;
– a pair of yellow small buttons;
– needle and scissors.
Abbreviations:
Sc – single crochet
İnc – increase
Dec – decrease
Ch – air loop
Sl-st – connecting column
Let’s get started!
HEAD.
Beige yarn.
1: 6Sc in amigurumi ring (6)
2: 6İnc (12)
3: (1Sc, 1İnc) – 6 times (18)
4: (2Sc, 1İnc) – 6 times (24)
5: (3Sc, 1İnc) – 6 times (30)
6: (4Sc, 1İnc) – 6 times (36)
7-12: 36Sc (36)
13: (4Sc, 1Dec) – 6 times (30)
14: (3Sc, 1Dec) – 6 times (24)
15: (2Sc, 1Dec) – 6 times (18)
Fill the part. Add filler as needed.
16: (1Sc, 1Dec) – 6 times (12)
17: 6Dec (6)
Finish knitting, pull the hole with a needle. Hide the thread.
NOSE.
Beige yarn.
1: 6Sc in amigurumi ring (6)
2: 6İnc (12)
3: 12Sc (12)
4: 6 Dec (6)
Finish knitting. Stuff your nose. Leave the thread for sewing.


EARS – 2 parts.
Beige yarn.
1: 3Sc into the amigurumi ring (do not close the ring), turn (3)
2: 3Sc in the first loop, 2İnc, turn (7)
3: 7Sl-st (7)
Finish knitting, leaving a long thread for sewing.
MUSTACHE.
Black yarn.
1: chain from 7Ch, 1Sl-st into the second loop from the hook
2: 5Ch, 1Sl-st to the next loop of the 1st row, 4Ch, 1Sl-st to the next loop of the 1st row, 3Ch, 1Sl-st to
next loop of the 1st row, 3Ch, 1Sl-st to the next loop of the 1st row, 4Ch, 1Sl-st to the next
loop of the 1st row, 5Ch, 1Sl-st to the next loop of the 1st row.
Finish knitting, leaving the thread for sewing.
BODY.
We start knitting with blue yarn.
1: 8Sc in Amigurumi Ring (8)
2: 8İnc (16)
3: (1Sc, 1İnc) – 8 times (24)
4: (2Sc, 1İnc) – 8 times (32)
5: (3Sc, 1İnc) – 8 times (40)
6-14: 40Sc (40)
15: (3Sc, 1Dec) – 8 times (32)
Change the yarn to red.
16: 32Sc (32)
17: (2Sc, 1Dec) – 8 times (24)
18-21: 24Sc (24)
22: (2Sc, 1Dec) – 6 times (18)
23: 18Sc (18)
Finish knitting, leaving a long thread for sewing. Fill the part.
HANDS – 2 parts.
We start knitting with white yarn.
1: 8Sc in Amigurumi Ring (8)
2: (3Sc, 1İnc) – 2 times (10)
3-4: 10Sc (10)
5: 5Sc, 4Ch, starting from the second from the hook of the loop 3Sl-st, 5Sc (10 and the “finger”)
6: 10Sc (hold your finger on the front of the knit and knit Sc behind it) (10)
7: (3Sc, 1Dec) – 2 times (8)
8 behind the front wall of the loop: (1Sc, 1İnc) – 4 times (12)
Finish knitting with white yarn.
Attach the red yarn to the back of one of the loops of the 7th row and knit 1Sl-st.
9: (3Sc, 1İnc) – 2 times (10)
10-16: 10Sc (10)
Stuff your hands. Fold the last row in half and knit through 2 rows of 5Sc. Finish
knitting. Leaving the thread for sewing.
Mario amigurumi
HOOKS – 2 parts.
Blue yarn.
1: 3Ch, starting from the second loop from hook 2Sc, rotate (2)
2-28: 2Sc, rotate (2)
Finish knitting, leave the thread for sewing.
Mario amigurumi
LEGS – 2 parts.
Blue yarn.
1: 8Sc in Amigurumi Ring (8)
2: 8İnc (16)
3: 16Sc behind the back of the hinge (16)
4-8: 16Sc (16)
Finish knitting, fill your legs. Leave the thread for sewing. Do not close the hole.
The open part of the leg will be sewn to the body.
SHOES – 2 details.
Brown yarn.
1: 6Sc in amigurumi ring (6)
2: 6İnc (12)
3: (5Sc, 1İnc) – 2 times (14)
4-10: 14Sc (14)
11: 7Dec (7)
Finish knitting, fill the part and close the hole with a needle. Sew shoes to
the closed part of the leg (to the beginning of knitting the leg).
HAT.
Red yarn.
1: 8Sc in Amigurumi Ring (8)
2: 8İnc (16)
3: (1Sc, 1İnc) – 8 times (24)
4: (2Sc, 1İnc) – 8 times (32)
5: (3Sc, 1İnc) – 8 times (40)
6: (4Sc, 1İnc) – 8 times (48)
7: (5Sc, 1İnc) – 8 times (54)
8: 54Sc (54)
9: (4Sc, 1Dec) – 9 times (45)
10: 45Sc (45)
11: (3Sc, 1Dec) – 9 times (36)
12: 25Sc. Leave the remaining 11 loops untied. These 25 loops will be the front
hats that are slightly above the back. Finish knitting, hide the thread.
13: attach the thread in the middle (6 loop) of 11 non-knit loops, knit 36Sc. When
get to 25 stitches in the previous row, just keep on knitting Sc.
Similarly, continue to knit when you get to the end of these 25 loops and go to 11
unworked. (36)
14: 36Sc (36)
Finish knitting. Hide the thread.
Visor hats.
Attach the red thread to the last row. Count 12 loops and attach the thread to the 13th
loop from the end of knitting.
1: 1Ch, 1Sc in the same loop to which the thread was attached, 11Sc, rotate knitting (12)
2: 12Sc behind the front wall of the hinge, rotate (12)
3-6: 12Sc, rotate (12)
7: 1Dec, 8Sc, 1Dec (10)
Do not turn knitting.
1Ch. Then tie the front part of the peak with connecting posts, without
the sides of the visor (in the corners and at the junction of the visor and hat according to 2Sc),
hat connecting posts. When you get to the beginning of the binding, connect the last and
the first loop with 1Sl-st, finish knitting, hide the thread.
LOGO ON THE HAT.
White yarn.
1: 8Sc in Amigurumi Ring (8)
2: 8İnc (16)
Finish knitting. Sew to the hat. Cut out of red felt
the letter M. First, make
it is on paper to make sure the dimensions are correct. Glue the letter from red felt into
center of the white circle.
WHISKERS.
The author of the scheme suggests using brown yarn. But I would take black, because hair and mustache
Mario from black yarn.
1: 3Ch, starting from the second loop from hook 2Sc, rotate (2)
2: 2Sc, rotate (2)
3: skip the first loop, 1Sc (1)
Finish knitting, leaving the thread for sewing.
HAIR.
Black yarn.
1: 15Ch, starting from the second loop from the hook, (1Sc, 3Ch) – 13 times, 1Sc.
Finish knitting. Leaving the thread for sewing.
Gather all the details together and sew them, guided by photographs.
Cut the eyes out of felt and glue them to the head.
That’s all!


Our Mario is ready.