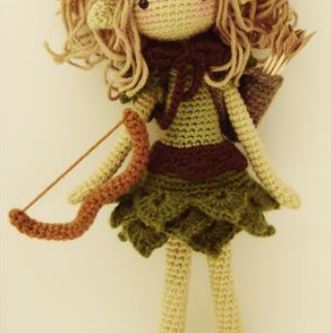
Designs
Doll Free Pattern: https://amigurumi.myeatbook.com/category/amigurumi-doll/
We will need:
Yarn for knitting various colors (author
used – Lion Brand Vanna’s Choice)
2.25 mm vs 2.75 mm hook
Scissors
Stitch markers
Stitching needles
Filler
Plastic circle
6 mm safety eyes
Light pink paint or blush for fabric
Wooden pins, paper, hot glue.
Legs

The doll is knitted from the legs up, so we start with knitting
our pair of legs. We will knit a doll continuously.
Use a 2.25 mm hook for the legs, body, arms and head.
We stuff legs, a body and a head. Hands are not full. Not
stuff the doll very tightly (you can add 5
rows of legs to make your doll more “light”).
Rnd 1.4 Sc in the ring
amigurumi
(4)
Rnd 2. [increase] 4x (8)
Rnd 3. increase, 7 Sc (9)
Rnds 4.-31. Sc in a circle (28 rows) (9)
Be sure to fill your foot while knitting, and do not wait until the end.
When you finish knitting 1 leg, do Sl-st and close the knitting, cut the thread. Next, tie 2 legs, but not
close the knitting. We do 2 Ch and Sl-st in Sl-st on 1 leg.
(use the photo below for a hint)
Body
Rnd 32.8 Sc, 2 sat in air loops (back side of the loop), 9 Sc, 2 sat in air loops
hinges (front side of the hinge)
(21)
Rnds 33.-34. Sc in a circle (21)
Rnd 35. increase, 3 Sc, increase, [4 Sc, increase] 2x, 3 Sc, increase, 2 Sc (26)
Rnd 36. Sc in a circle (26)
Rnd 37. 3 Sc, increase, 4 Sc, increase, [5 Sc, increase] 2x, 5 Sc (30)
Rnd 38. Dark green thread, Sc in a circle (30)
Rnd 39. Brown thread, Sc in a circle only in the back side of the loop (30)
Rnd 40. decrease, 3 Sc, decrease, [4 Sc, decrease] 2x, 3 Sc, decrease, 2 Sc, decrease, 2 Sc (24)
Rnd 41. Light green thread, Sc in a circle only in the back side of the loop (24)
Rnd 42. 2 Sc, decrease, 3 Sc, decrease, [4 Sc, decrease] 2x, 3 Sc (20)
Rnds 43.-49. Sc in a circle (20)
Rnd 50.3 Sc, Decrease, 8 Sc, Decrease, 5 Sc (18)
Rnd 51. Decrease, 6 Sc, Decrease, 8 Sc (fill the body) (16)
Rnd 52.4 Sc, Decrease, 5 Sc, Decrease, 3 Sc (14)
Rnd 53. 2 Sc, decrease, 6 Sc, decrease, 2 Sc (12)
Rnd 54.3 Sc, Decrease, 3 Sc, Decrease, 2 Sc (10)
Rnd 55. Beige thread, Sc in a circle only in the back side of the loop (10)
Rnd 56. Sc in a circle (10)
When you knit 56 row do not cut the yarn. Stuff your body and neck, and then follow the instructions below to
knitting a head. Do not stuff your body and neck too tightly. Take the resulting part and roll it
between the palms to distribute the filler evenly.
Head
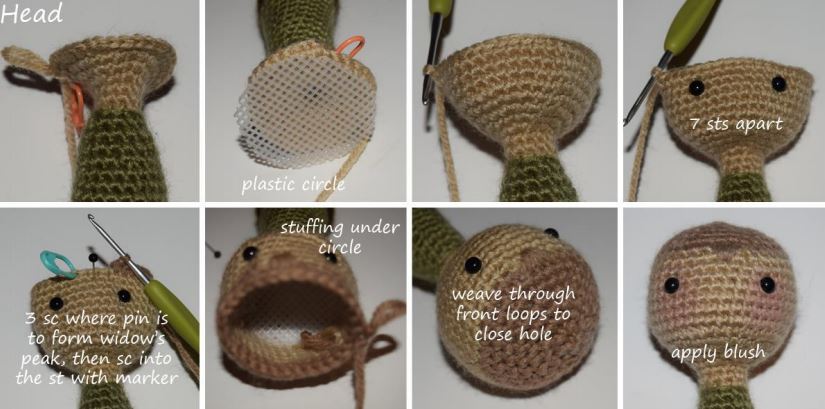
The eyes will need to be placed between 10 and 11 rows, 7 loops between them. Also, do not forget to tightly
stuff your head in the process of knitting. Use a round piece of plastic to place where the neck ends and
the head begins. With this, you ensure roundness of the head. You can use any
plastic, for example, a cover from yogurt.
Rnd 1. Continue to knit, 10 Sc (10)
Rnd 2. [1 Sc, increase] 5x (15)
Rnd 3. 1 Sc, increase, [2 Sc, increase] 4x, 1 Sc (20)
Rnd 4. [3 Sc, increase] 5x (25)
Rnd 5. 2 Sc, increase, [4 Sc, increase] 4x, 2 Sc (30)
Rnd 6. [5 Sc, increase] 5x (35)
Circle and cut a plastic circle equal to the 6th row, glue it after the 15th row
Rnd 7.1 Sc, increase, 14 Sc, increase, 7 Sc, increase, 10 Sc (38)
Rnds 8.-12. Sc in a circle (do not forget to put your eyes after the 10th row) (38)
Rnd 13. 1 Sc, decrease, 1 Sc 4, decrease, 7 Sc, decrease, 10 Sc (35)
Rnd 14. Light brown thread, Sc in a circle (add a small bang as shown in the picture
below)
(35)
Rnd 15. [5 Sc, decrease] 5x (30)
Rnd 16. 2 Sc, decrease, [4 Sc, decrease] 4x, 2 Sc (25)
Rnd 17. [3 Sc, decrease] 5x (20)
Rnd 18. 1 Sc, decrease, [2 Sc, de decrease c] 4x, 1 Sc (begin stuffing head) (15)
Rnd 19. [1 Sc, decrease] (10)
Rnd 20. [decrease] 5x (5)
Close the knitting after making sure that your head is tight. I advise you to use a piece
plastic to round the head and the filler did not pass into the neck and body. If you will not use
plastic, then the head will be shaped like a balloon. After you fill your head tightly close
knitting. Take the needle and sew the remaining hole. Use a marker or rouman. To make
pink cheeks. The photo below shows the entire process in detail.
Hair
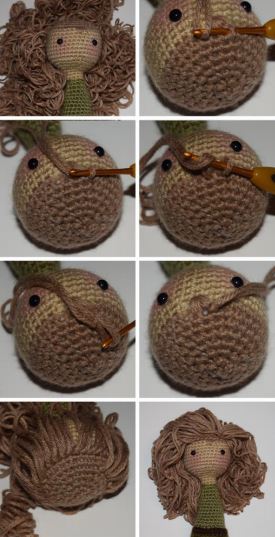
There are many ways to attach amigurumi hair and you can use whatever you want.
like. The author shows in detail how he attached the hair in the photographs below. He uses a way
“Latch” as described below. The author used a 2.75 mm hook.
“Latch” hair
Step 1
Insert the hook into the gap between the 2 loops and pull it into the hole above or below.
Step 2
Fold the yarn in half and using a hook, pull it through the loop leaving a small piece of yarn on
hooked.
Step 3
Pull the ends of the hair through the loop using a hook.
Step 4
Pull the ends down to tighten the loop and fix the hair. Start with a hairline.
Elven ears
Use a 2.25 mm hook and beige yarn. Not
stuff your ears. Use a marker to avoid confusion.
Rnd 1.
Beige thread, 3 Sc per ring
amigurumi
(3)
Rnd 2. [increase 3x (6)
Rnd 3. [Sc increase] 3x (9)
Rnd 4. [2 Sc, increase] 4x (12)
Rnd 5. [2 Sc, decrease] 4x (9)
Rnd 6. [1 Sc, decrease] 3x to close
knitting leave long
thread for sewing.
(6)
Hands
Use the hook 2.25 mm, beige and
green yarn. Do not stuff. Use
marker, so as not to get confused. Rnd 1.
Beige Thread, 3 Sc in Amigurumi Ring (3)
Rnd 2. [increase] 3x (6)
Rnd 3. increase, 5 Sc (7)
Rnds 4.-22. Sc in a circle (7)
Rnd 23. Green thread, Sc in a circle (7)
Rnd 24. Sc in a circle we knit in the back of the loop (7)
Rnds 25.-26. Sc in a circle (7)
Tie both sides of the Sc hole as shown in the image below.
Knitting on top of a toy
Collar
We use a 2.75 mm hook and attach the thread to the row in which we
knitted only in the back of the loop. Knitting pattern ——————-
Rnd 1. Sc, increase in the next front loop, [1 Sc,
increase] 4x, increase, Sl-st in th loop
(17)
Rnd 2. 1 Ch, [Sc, 3 Ch, Sc] in 1 loop, [skip loop1, [Sc, 3 Ch, Sc] in
next loop] repeat to the end, close the knitting.
Sleeves
We use a 2.75 mm hook and attach the thread to the row in which we
knitted only in the back of the loop. Knitting pattern ——————-
Rnd 1. Sc, 3 Ch, Sc in the same loop, [skip loop1, [Sc, 3 Ch, Sc] in the next
loop] repeat to the end
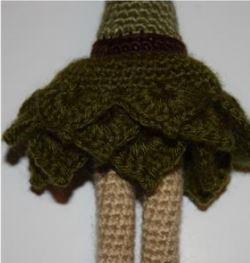
Leaf skirt
We use a 2.75 mm hook and attach the thread to the row in which we knit only in the back
loops. The knitting pattern is shown below:
Rnd 1. Sc green thread, Sc to the next front loop, increase to the next
front loop, [4 Sc, increase] 5x, 2 Sc, Sl-st
(36)
Rnd 2. 1 Ch, [5 Sc, increase] 6x, Sl-st (42)
Rnd 3.1 Ch, 3 Sc, increase, [6 Sc, increase] 5x, 3 Sc, Sl-st (48)
Rnd 4. 1 Ch, 11 Sc, increase, [23 Sc, increase] 1x, 12 Sc, Sl-st (50)
Rnd 5.1 Ch, Sc in a circle, Sl-st (50)
Rnd 6. 1 Ch, Sc in 1 loop, 2 Ch, * [3Sc, (Sc, 6 Ch, Sl-st] in the next loop, 4 Sc, 2 Ch; repeat
what is marked * in a circle, Sc in the last loop, Sl-st
Rnd 7. 2 Ch, * [2 Sc, (5 Dc, 3 Ch picot, 5 Dc] in the next 6 Ch;; repeat what is marked * by
circle, 2 Sc in the last loop, Sl-st
Rnd 8. 1 Ch, [Sc, 6 Ch, Sl-st] in 1 loop, * 3 Ch, work for Sl-st of the last row, skip 3 Sc in 2
ranks below [Sc, 2 Ch, Sl-st] in the next loop, 3 Ch **, [Sc, 6 Ch, Sl-st] in the next 2 Ch 2
ranks below; repeat from * around, ending **, [Sc, 6 Ch, Dc] to the last Sc in
current row, sl-st
Rnd 9. 3 Ch (considered as Dc) 3 Ch pico, 5 Dc in the next 3 Ch * skip 3 Ch, Sc in
next 2 Ch **, skip 3 Ch, [5 Dc, 3 Ch pico, 5 Dc] in the next loop; repeat
from * around, ending **, [5 Dc, 3 Ch pico, 3 Ch, Sl-st] to the last loop, Sl-st
Rnd 10. 1 Ch, [Sc, 2 Ch, Sl-st] in Sc 2 rows below, * 3 Ch, work for Sl-st of the last row, skip 3
Sc in 2 rows below, [Sc, 6 Ch, Sl-st] in the next 2 Ch, skip 3 Ch, [Sc, 2 Ch, Sl-st] in
next loop; repeat what is marked * in a circle, Sl-st
Rnd 11. 2 Ch, * [Sc in the next 2 Ch, (5 Dc, 3 Ch pico, 5 Dc] in the next 6th Ch; repeat that
what is marked * in a circle, Sc in the last 2 loops
Brown trim or belt
We use a 2.75 mm hook and attach the thread to the row in which we knitted
only in the back of the loop. Knitting pattern shown ->
Rnd
1.
We attach the thread Sc, Sc to the next front loop, increase, [2 Sc,
increase] to the last 3 loops, 3 Sc, Sl-st
(31)
Rnd
2.
1 Ch, Sc in a circle, Sl-st (31)
Rnd
3.
1 Ch, Sc in the same loop, [skip 2 loops, 5 Dc in the next loop, skip 2 loops,
Sc to the next loop] repeat to the end. Close the knitting and hide the thread. Belt
finished!
Leaf scarf
We will use
hook 2.75 mm and knit
in rows. We will use
3 Ch picot and crocodile
the skin
Green thread, 6 Ch, Dc in 2 loop from the hook, 1 Ch,
skip 1 loop, 2 Dc into the next loop, 1 Ch,
skip 1 loop, dc to last ch, turn
(4)
Row 2. 3 Ch, skip 1 loop, 4 embossed facial st. without
double crochet in 1 Dc, 3 Ch pico, 5 Embossed facial st. without
crochet in the next Dc, skip the last Dc, Sl-st in
Ch after turning, turning
(1 sheet)
Row 3. 3 Ch, 2 Dc towards the leaf, 1 Ch, 1 Dc towards the center of the leaf, 1
Ch, 2 Dc to the other side of the sheet, turn
(5)
Row 4. 3 Ch 4 embossed facial Dc around 1 Dc, 3 Ch pico, 5
embossed facial Dc around the next Dc,
skip next Dc, 5 embossed facial Dc
around the next Dc, 3 Ch pico, 5 embossed facial
Dc around the next Dc, cc to the top
Swivel Ch to fasten the sheet, turn
(2 sheets)
Row 5. 3 Ch, 2 Dc towards the leaf, 1 Ch, 1 Dc towards the center of the leaf, 1
Ch, 2 Dc to the other side of the sheet, 1 Ch, 1 Dc to the center
sheet 1 Ch, 2 Dc to the other side of the sheet, turn
(8)
Row 6. 3 Ch, 4 embossed facial Dc around 1 Dc, 3 Ch picot, 5
embossed facial Dc around the next Dc,
skip next Dc, 5 embossed facial Dc
around the next Dc, 3 Ch pico, 5 embossed facial
Dc around next Dc, skip next Dc,
5 embossed facial Dc around the next Dc, 3 Ch
picot, 5 relief facial Dc around the last Dc cc
to the top of rotary Ch to secure the sheet,
turn
(3 sheets)
Row 7.3 Ch, 2 Dc
to the side
leaf
1 Ch, 1 Dc to the center leaf, 1 Ch, 2 Dc to the other side of the leaf, 1 Ch, 1 Dc to the center of the leaf 1 Ch,
2 Dc to the other side of the sheet, 1 Ch, 1 Dc to the center of the sheet 1 Ch, 2 Dc to the other side of the sheet,
turn
(eleven)
Row 8. 3 Ch, 4 embossed facial Dc around 1 Dc, 3 Ch picot, 5
embossed facial Dc around the next Dc,
skip next Dc, 5 embossed facial Dc
around the next Dc, 3 Ch pico, 5 embossed facial
Dc around next Dc, sk next dc, skip
next Dc, 5 embossed facial Dc around
next Dc, 3 Ch pico, 5 embossed facial Dc
around the next dc, skip the next dc, 5
embossed facial Dc around next Dc, 3 Ch
picot, 5 embossed facial Dc around the last Dc, cc
to the top of the rotary Ch to fasten the sheet ,turn
(4 sheets)
Row 9. 3 Ch, 2 Dc towards the leaf, 1 Ch, 1 Dc towards the center of the leaf, 1
Ch, 2 Dc to the other side of the sheet, 1 Ch, 1 Dc to the center
leaf, 1 Ch, 2 Dc to the other side of the leaf, 1 Ch, 1 Dc to
leaf center, 1 Ch, 2 Dc to the other side of the leaf, 1 Ch, 1
Dc to the center of the sheet, 1 Ch, 2 Dc to the last side
leaf turn
(14)
Row 10. 4 embossed facial Dc around 1 Dc, 3 Ch pico, 5 embossed facial
Dc around next Dc, skip next Dc, 5 embossed
facial Dc around the next Dc, 3 Ch pico, 5 embossed facial
Dc around next dc
skip next dc 5
embossed facial dc
around the next Dc, 3 Ch
pico, 5 embossed facial
Dc around the next Dc,
skip next dc 5
embossed facial dc
around the next Dc, 3 Ch
pico, 5 embossed facial
Dc around the next Dc,
skip next dc 5
embossed facial dc
around the next Dc, 3 Ch
pico, 5 embossed facial
Dc around the last Dc, cc
to the top of the pivot
Ch to fasten the sheet,
turn
(5 sheets)
Row 11. Brown thread, 1 Ch, 22 ps evenly, twist (22)
Row 12. 1 Ch, psn in each loop of the previous row, turn (22)
Row 13. 1 Ch, Sc in each loop, only in the back of the loop (22)
Close knitting, hide the ends. Attach with a Sl-st with a brown thread to the front
shawls and then make 25 stitches. Repeat on the opposite side and then close the knitting and
hide the ends.
Headdress
Use a 2.75 mm hook and dark gray yarn. If you want to adjust the size, increase or
reduce the amount of Ch in the chain.
Row 1. 37 Ch, Sc into 2 loops from the hook and into each loop further,
Sl-st with 1 loop (form a circle)
(36)
Rnd 2. 1 Ch, psn in the back of the loop in the same loop where
joined, psn to the front of the loop in
the next loop [psn to the back, psn to the front
loop] to the end, Sl-st
(36)
Rnds 3-4. Repeat 2 row (36)
Rnd 6. 1 Ch, Sc in a circle, Sl-st (36)
Close the knitting, and then tie the stitches of the first row, hide the thread.
Footwear
Use a 2.25 mm hook and a dark brown thread. Be sure to use a stitch marker.
Rnd 1.4 Sc to Amigurumi Ring (4)
Rnd 2. [increase] 4x (8)
Rnd 3. 1 Sc, increase, [3 Sc, increase] 1x, 2 Sc (10)
Rnd 4. [4 Sc, increase] 2x (12)
Rnd 5. Sc in a circle (12)
Row 6. 6 Sc, 1 Ch, turn (6)
Row 7. 6 Sc, 1 Ch, turn (6)
Row 8. decrease, 2 Sc, decrease, 1 Ch, turn (4)
Row 9. decrease, decrease, 1 Ch, turn (2)
Row 10. decrease, place the loop marker (1)
Rnd 11. 3 Sc to the bottom of the boot, 6 Sc to the front of the boot, 3 Sc to
side of the boot
(thirteen)
Rnds. 12.-19. Sc in a circle (13)
Rnd 20. Golden brown [Sc at the back of the loop, 3 Ch, Sc at the back
loops] in 1 loop, [skip the next loop, [Sc to the back of the loop, 3 Ch,
Sc to the back of the loop] to the next loop] repeat to the end
Close the knitting, hide the ends. We put shoes on the elf’s legs.
Bow and quiver
Bow
We use a hook 2.25 mm and
brown thread. Rnd 1.
4 Sc in Amigurumi Ring (4)
Rnd 2. increase, 3 Sc (5)
Rnd 3. Sc in a circle (5)
Rnd 4. increase, 4 Sc (6)
Rnds 5.-30. Sc in a circle (6)
Rnd 31. Decrease, 4 Sc (5)
Close the knit and leave a long thread. Place a wire inside the bow so that it can be attached
shape and fill the part. Close the hole and sew the thread on the other side of the bow to make a bowstring.
After that, sew the bow in your hand.
Quiver
Use a 2.25 mm hook and brown thread
Rnd 1.6 Sc to Amigurumi Ring (6)
Rnd 2. [1 Sc, increase] 3x (9)
Rnd 3. Sc in a circle (9)
Rnd 4. increase, 8 Sc (10)
Rnd 5. Sc in a circle (10)
Rnd 6. increase, 9 Sc (11)
Rnd 7. Sc in a circle (11)
Rnd 8. increase, 10 Sc (12)
Rnds 9.-12. Sc in a circle (12)
Sl-st to the next loop, 20 Ch and Sl-st to the bottom of the quiver to make a strap. Close knitting and
hide the thread.
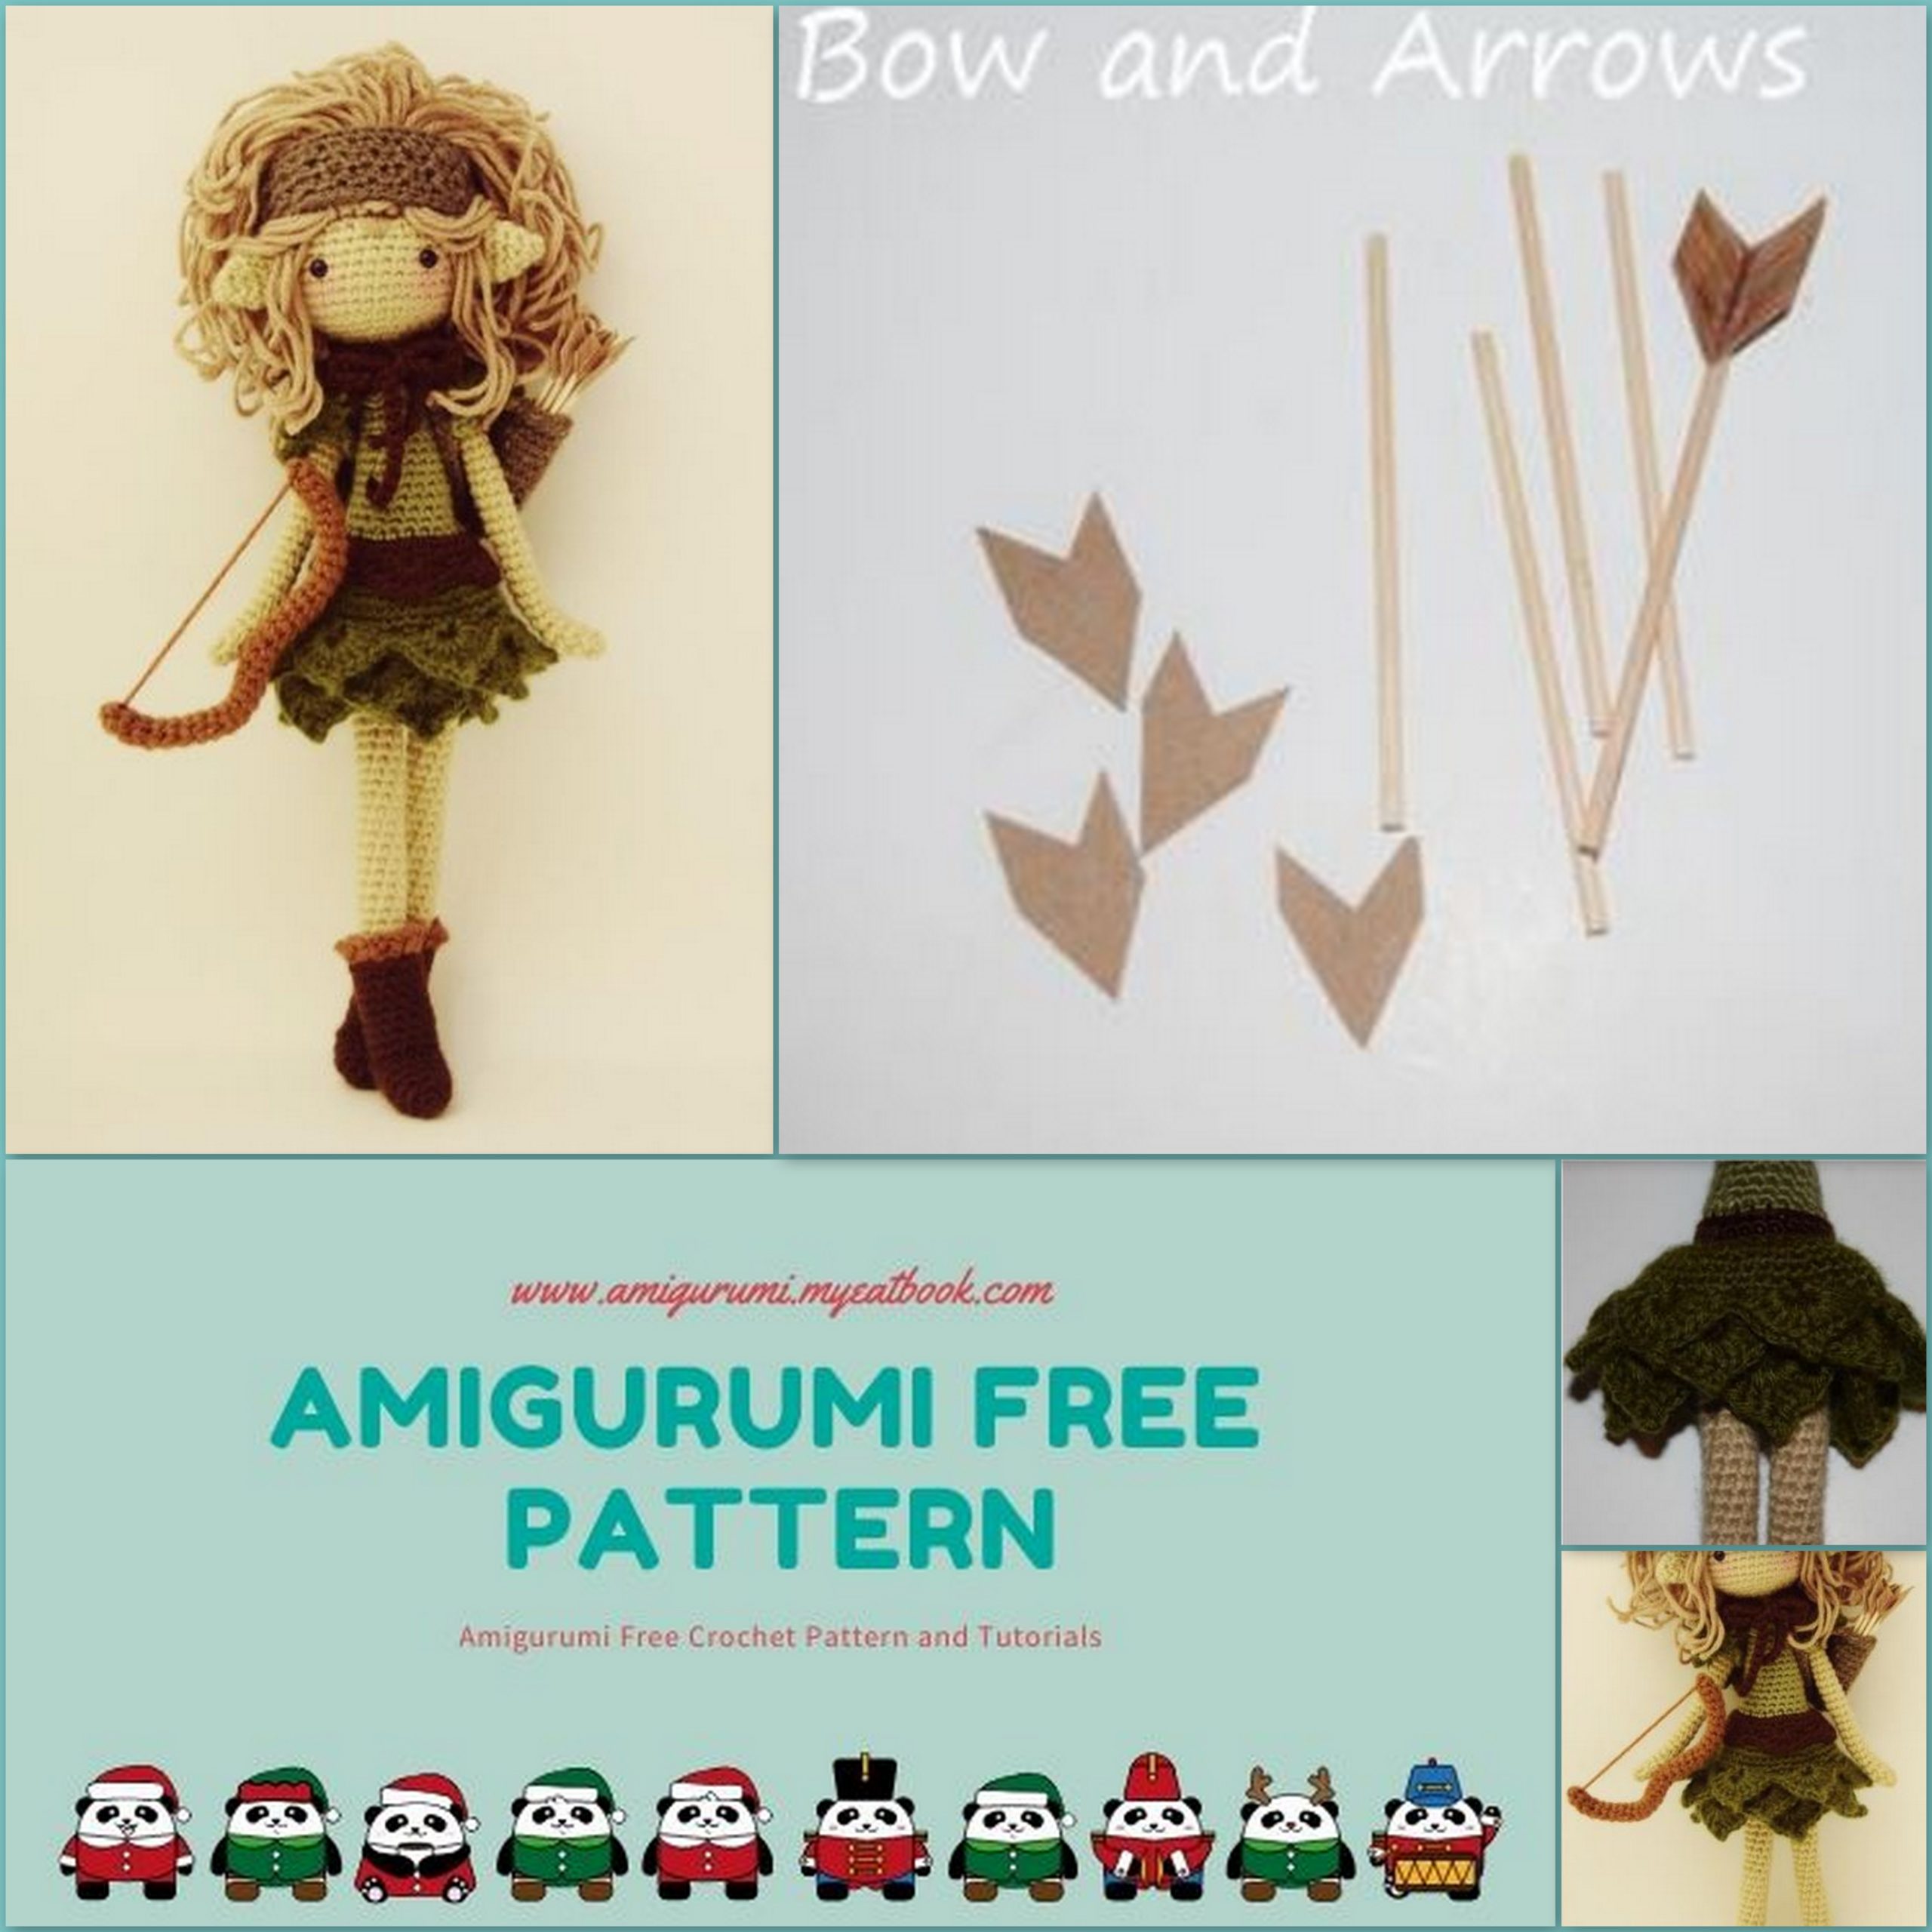
Arrows
To create arrows, you will need toothpicks, thick paper and hot glue. Cut on paper such
same shape as shown in the picture above and glue it to the toothpick. Use colored markers,
to decorate your arrow.
Congratulations, the toy is ready!
I will be glad to see you in my