HEAD yellow
1 p: 6 sc connect in the ring amigurumi (6)
2 p: 6 İnc (12)
3 p: (1 sc, İnc) – 6 (18)
4 p: (2 sc, İnc) – 6 (24)
5 p: (3 sc, İnc) – 6 (30)
6 p: (4 sc, İnc) – 6 (36)
7 p: 36
8 p: (5 sc, İnc) – 6 (42)
9 p: 42
10 p: (6 sc, İnc) – 6 (48)
11 p: 48
12 p: (7 sc, İnc) – 6 (54)
13 p; 54
14 p: (8 sc, İnc) – 6 (60)
15 p: 60
16 p: (9 sc, İnc) – 6 (66)
17 p: 66
18 p: (10 sc, İnc) – 6 (72)
19 p: (11 sc, İnc) – 6 (78) in the next row put two eye markers
20 p. * 12 sc, İnc MARKER-12 sc, İnc MARKER * REPEAT 84
21-25. 84sc
26.12 sc .Dec (78)
27. 78
28.11 sc Dec. (72)
29. 72
30.10 sc Dec. (66)
31. 9 sc Dec. (60)
32.8 sc Dec. (54)
33. 7 sc Dec. (48)
34.6 sc Dec. (42)
35.5 sc Dec. (36)
36.4 sc Dec. (thirty)
37. 3 sc Dec. (24)
38. 2 sc Dec. (18)
39. 1 sc Dec. (12)
40. 6 Dec. (6)
BODY (DARK BROWN)
1 p: 6 sc connect in the ring amigurumi (6)
2 p: 6 İnc (12)
3 p: (1 sc, İnc) – 6 (18)
4 p: (2 sc, İnc) – 6 (24)
5 p: (3 sc, İnc) – 6 (30)
6 p: (4 sc, İnc) – 6 (36)
7 p: (5 sc, İnc) – 6 (42)
8 p: (6 sc, İnc) – 6 (48)
9 p: (7 sc, İnc) – 6 (54)
10 p: 54
11 p: (8 sc, İnc) – 6 (60)
12 r: 60
now knit yellow
13-16p; 60
change to dark brown
17-20r. 60
change to yellow
21-24r: 60
change to dark brown
25-28r: 60
change to yellow
29p: 60sc
30p: 8 sc Dec. (54)
31p: 7 sc Dec. (48)
32p: 6 sc Dec. (42)
change to dark brown
33p: 5 sc Dec. (36)
34p: 4 sc Dec. (thirty)
35p: 3 sc Dec. (24)
36p: 2 sc Dec. (18)
change to yellow
37p: (2 sc, İnc) – 6 (24)
38r: (3 sc, İnc) – 6 (30)
39р: (4 sc, İnc) – 6 (36)
40r: (5 sc, İnc) – 6 (42)
41p: (6 sc, İnc) – 6 (48)
42-46P: 48sc
47p: 6 sc Dec. (42)
48r: 42
49р:: 5 sc Dec. (36)
50p: 4 sc Dec. (thirty)
51p: 3 sc Dec. (24)
52p: 2 sc Dec. (18)
tighten the hinges, İnc write your head to the body
NOW KNITTING FINGERS, CONNECT WILL BE LATER
Thumb:
1 p: 6 sc connect in the ring amigurumi (6)
2-3p: 6 sc
3 fingers
1 p: 6 sc connect to the ring (6)
2-4r: 6sc DO NOT CUT THE THREAD AFTER THE END OF THE THIRD
FINGER!!!
Starting to join your fingers in single crochet columns (SEE PHOTO)
1-2p: 18sc
RIGHT: JOIN THE BIG FINGER TO THE FIRST POSTER AND
CONTINUE KNITTING 17 sc (18)
LEFT: 6sc. JOIN THE BIG FINGER AND CONTINUE KNITTING
11 sc (18)
CONTINUE KNITTING GRAVING REMAINING LOOP BIG
FINGERS
4 p: 23sc
5p: (2sc, Dec) – 5 times, 3 sc (18)
6p: 1sc, Dec (12)
7p: 12sc
8p: 2sc, Dec (9)
change to dark brown
9p: * 2sc, prib * (12)
10-19p: 12sc
MAKE A LONG YELLOW LACE AND SEW ON HAND WHERE
BORDER YELLOW AND BROWN
1 p: 6 sc connect to the ring (6)
NEXT KNIT 6sc NEEDED LENGTH TO GRAB HAND
EYES
WHITE
1 p: 6 sc connect in the ring amigurumi (6)
2 p: 6 İnc (12)
3 p: (1 sc, İnc) – 6 (18)
4p: 4sc-3sc in one – 8sc – 3sc in one – 4sc (22)
5p: 5sc-3sc in one – 10sc – 3sc in one – 5sc (26)
6p: 6sc-3sc in one – 12sc – 3sc in one – 6sc (30)
7p: 7sc-3sc in one – 14sc – 3sc in one – 7sc (34)
PUPIL) black)
1 p: 6 sc connect to the ring (6)
2 p: 6 İnc (12)
3 p: (1 sc, İnc) – 6 (18)
4 p: (2 sc, İnc) – 6 (24)
TIE CHAIN BROWN CHAIN AND CHAIN
SEND IT TO THE PUPILS ON THE EDGE. Embroider white highlights on the pupils. First
sew the white part of the eyes, then the pupils.
LEGS (yellow) if desired, you can insert a wire
1 p: 6 sc connect in the ring amigurumi (6)
2p: (1 sc, İnc) – (9)
3p: (2 sc, İnc) – (12)
4p: (3 sc, İnc) – (15)
5p: (4 sc, İnc) – (18)
6p: (2 sc, İnc) – (24)
7p: (3 sc, İnc) – (30)
8-10r: 30sc
11p: 3sc, Dec – (24)
12p: 24sc
13p: 2sc, Dec – (18)
14-18r: 18sc
19p: 1sc, Dec – (12)
20p: 6 Dec – (6) tighten the loops
DARK BROWN COLOR. AT THE TOP OF THE FEET TIE A CIRCLE OF
15 sc (SEE PHOTO)
1-18P: 15sc
tighten the loop
YELLOW TIE HARNESS HOW KNITTED FROM 6sc, KNIT
NEEDED LENGTH TO GRAB THE PLACE OF CONNECTING THE STEP AND
LEGS
1 p: 6 sc connect to the ring (6)
NEXT KNIT 6sc NEEDED LENGTH TO GRAB THE LEG
BIG WINGS
INSIDE INSIDE THE WHITE ELECTRICAL CABLE (FORM
WINGS) TO IMAGE WINGS (SEE PHOTO). WINGS
DO NOT PICK
1 p: 6 sc connect in the ring amigurumi (6)
2 p: 6 İnc (12)
3 p: (1 sc, İnc) – 6 (18)
4 p: (2 sc, İnc) – 6 (24)
5 p: (3 sc, İnc) – 6 (30)
6 p: (4 sc, İnc) – 6 (36)
7 p: (5 sc, İnc) – 6 (42)
8p: 42sc
9p: (6 sc, İnc) – 6 (48)
10p: 48sc
11p: (7 sc, pr) – 6 (54)
12p-19p: 54 sc
20 p: (7 sc, Dec) – 6 (48)
21-23р: 48sc
24p:: (6 sc, Dec) – 6 (42)
25-27r: 42sc
28p:: (5 sc, Dec) – 6 (36)
29-30r: 36sc
31p: (4 sc, Dec) – 6 (30)
32-33r: 30sc
34p: (3 sc, Dec) – 6 (24)
35p: 24sc
36p: (2 sc, Dec) – 6 (18)
37p: 18sc
Insert İncovod
38p: (1 sc, Dec) – 6 (12)
39r: 6
Dec (6)
Sew along the edge (where the wire is inside) with white threads. Make veins on the wings
blue or embroider or you can draw) (see photo)
LITTLE WINGS (do not insert wire, do not stuff)
1 p: 6 sc connect in the ring amigurumi (6)
2 p: 6 İnc (12)
3 p: (1 sc, İnc) – 6 (18)
4 p: (2 sc, İnc) – 6 (24)
5p: 24sc
6p: (3 sc, İnc) – 6 (30)
7p: 30sc
8p: (
4 sc, İnc) – 6 (36)
9-14r: 36sc
15p:: (4 sc, Dec) – 6 (30)
16-18r: 30sc
19p: (3 sc, Dec) – 6 (24)
20-21p: 24sc
22p:: (2 sc, Dec) – 6 (18)
23-24r: 18sc
25p: (1 sc, Dec) – 6 (12)
26-28r: 12sc
Embroider the edges of the wings and veins with light blue (as in the photo)
Antenna (yellow)
1 p: 6 sc connect in the ring amigurumi (6)
2 p: 6 İnc (12)
3 p: (1 sc, İnc) – 6 (18)
4-6p: 18sc
7p: (1 sc, Dec) – 6 (12)
Fix on the wire (as in the photo) with glue or tie
8p: 6 Dec (6)
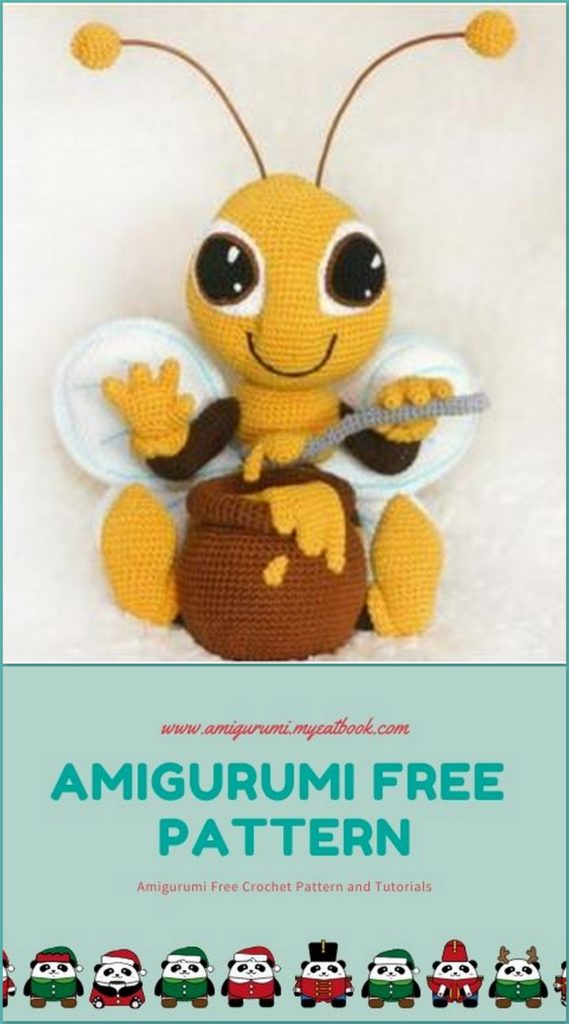
POT WITH HONEY
BROWN
1 p: 6 sc connect in the ring amigurumi (6)
2 p: 6 İnc (12)
3 p: (1 sc, İnc) – 6 (18)
4 p: (2 sc, İnc) – 6 (24)
5 p: (3 sc, İnc) – 6 (30)
6 p: (4 sc, İnc) – 6 (36)
7 p: (5 sc, İnc) – 6 (42)
8 p: (6 sc, İnc) – 6 (48)
9 p: (7 sc, İnc) – 6 (54)
10p: 54sc for the rear loops !!!
11p: (8 sc, İnc) – 6 (60)
12p: 60sc
13p: (9 sc, İnc) – 6 (66)
14-26r: 66sc
27p: 9 sc Dec. (60)
28p: 9 sc Dec. (54)
change to yellow
29p: 7 sc Dec. (48) FOR THE BACK HINGES
30p: (6 sc, Dec) – 6 (42)
31p: (5 sc, Dec) – 6 (36)
32p: (4 sc, Dec) – 6 (30)
33p: (3 sc, Dec) – 6 (24)
34p: (2 sc, Dec) – 6 (18)
35p: (1 sc, Dec) – 6 (12)
36p: 6 Dec. – (6)
tighten the loop
POT EDGE
1 p: 9 sc connect in a ring AMIGURUMI (6)
2-58r: 9sc
check if the length is enough and sew the edge to the stitches of 29 rows
FLOWING HONEY
PART 1
1p: 6sc in amigurumi ring
2p: 2-3p: 6sc
PART 2
1p: 6sc in amigurumi ring
2p: 1sc, arr – (9)
3p: 9sc
PART 3
1p: 6sc in amigurumi ring
2-5r: 6sc
After tying the third part do not cut the thread, connect the second part to
first and keep knitting along both parts
1-4p: 15sc
5p: 9sc – attach the rest – 5sc then continue to knit all three
parts
6-11r: 20sc
connect the edges of 10sc and sew to the edge of the pot
DROP OF HONEY
1p: 6sc in amigurumi ring
2P: 6sc
3p: 2Dec, 2sc (4)
tighten the stitch and sew on the pot
SPOON (INSERTED CABLE)
Knit in light gray
1 p: 6 sc connect in the ring amigurumi (6)
2 p: 6 İnc (12)
3p: 12sc
4p: (1 sc, İnc) – 6 (18)
5-11r: 18sc
12p: 1sc, Dec (12)
13p: 6Dec (6)
14-38r: 6sc
tighten the loop
HONEY IN THE SPOON
1 p: 6 sc connect in the ring amigurumi (6)
2 p: 6 İnc (12)
3-8P: 12sc
9p: 6Dec (6)
Fill lightly, tighten the stitches and sew or glue to the spoon
BIG DROP
1 p: 6 sc connect in the ring amigurumi (6)
2 p: 6 İnc (12)
3-6P: 12sc
connect the edges of 6sc and sew to the edge of the spoon (see photo)
LITTLE DROP
1 p: 6 sc connect in the ring amigurumi (6)
2-3P: 6sc
4p: 2Dec, 2sc (4)
loop and sew to the drop (see photo)